
Table des matières:
- Auteur John Day day@howwhatproduce.com.
- Public 2024-01-30 09:05.
- Dernière modifié 2025-01-23 14:45.

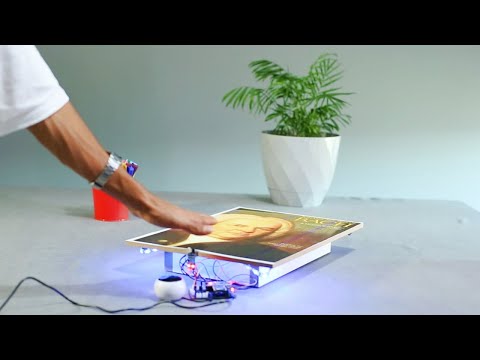
Dans cette vidéo, je vais vous montrer comment créer un projet artistique unique à la maison en utilisant une bande LED et du son.
Étape 1: Vidéo du projet

Bande LED -
Lecteur MP3 -
Capteur infrarouge -
Microcontrôleur -
Connecteur -
Adaptateur -
Régulateur de tension -
Intervenant -
Micro SD -
Condensateur -
Résistance -
Interrupteur à bascule -
Outils de soudure -
Étape 2: Schéma et Gerber

Obtenez le conseil -
Étape 3: Code source

Code source:
#comprendre
#include "SoftwareSerial.h" #include "DFRobotDFPlayerMini.h" #define NUM_LEDS_PER_STRIP 70 #define BRIGHTNESS 200 #define LED1pin 5 #define LED2pin 6 #define LED3pin 7 const int IR1pin = A0; const int IR2pin = A1; const int IR3pin = A2; CRGB LED1couleur[NUM_LEDS_PER_STRIP]; CRGB LED2couleur[NUM_LEDS_PER_STRIP]; CRGB LED3couleur[NUM_LEDS_PER_STRIP]; SoftwareSerial mySoftwareSerial (10, 11); // RX, TX DFRobotDFPlayerMini myDFPlayer; void printDetail (type uint8_t, valeur int); void setup() { mySoftwareSerial.begin(9600); Serial.begin(115200); if (!myDFPlayer.begin(mySoftwareSerial)) { Serial.println(F("Impossible de commencer:")); Serial.println(F("1. Veuillez revérifier la connexion !")); Serial.println(F("2. Veuillez insérer la carte SD !")); tandis que (vrai); } pinMode(IR1pin, INPUT); pinMode (IR2pin, ENTREE); pinMode(IR3pin, INPUT); monDFPlayer.volume(20); monDFPPlayer. EQ(DFPLAYER_EQ_CLASSIC); monDFPlayer.outputDevice(DFPLAYER_DEVICE_SD); FastLED.addLeds(LED1couleur, NUM_LEDS_PER_STRIP); FastLED.addLeds(LED2color, NUM_LEDS_PER_STRIP); FastLED.addLeds(LED3color, NUM_LEDS_PER_STRIP); FastLED.setBrightness(LUMINOSITÉ); } boucle vide() { if(digitalRead(IR1pin) == LOW) { LED1show(); } if(digitalRead(IR2pin) == LOW) { LED2show(); } if(digitalRead(IR3pin) == LOW) { LED3show(); } } void LED1show() { myDFPlayer.play(1); for(int i = 0; i
Conseillé:
Lumières de tasse de mousse de bricolage - Idée de décoration Diwali facile et bon marché utilisant des tasses en mousse: 4 étapes

Lumières de tasse de mousse de bricolage | Idée de décoration Diwali facile et bon marché à l'aide de gobelets en mousse: Dans cet article, nous allons parler du projet de célébrations de Diwali avec un budget limité. j'espère que ce tuto vous plaira
Conseils pour faire de votre idée de projet une réalité : 6 étapes (avec photos)
")
Conseils pour faire de votre idée de projet une réalité : La partie la plus critique d'un projet réussi est d'avoir une idée vraiment géniale, mais parfois l'idée est la partie facile ! Après cela vient le travail acharné pour transformer un éclair de génie aléatoire en quelque chose que les gens "ooh" et "ah" vo
Robot Gong : Idée de projet ultime de Hackaton pour les ventes et les geeks de produits (aucun codage requis) : 17 étapes (avec photos)
 : 17 étapes (avec photos)")
Robot Gong : Idée de projet ultime de Hackaton pour les ventes et les geeks de produits (aucun codage requis) : Construisons un gong musical robotique déclenché par e-mail. Cela vous permet de configurer des alertes e-mail automatisées pour déclencher le gong… (via SalesForce, Trello, Basecamp…) Votre équipe n'oubliera plus jamais de "GONGGG" quand un nouveau code sort, un dea
Coffre au trésor Zelda (avec lumières et son) : 12 étapes (avec photos)
 : 12 étapes (avec photos)")
Coffre au trésor Zelda (avec lumières et son) : Bonjour à tous ! J'étais un grand fan des jeux Legend of Zelda quand j'étais plus jeune, mais je pense que presque tout le monde connaît la mélodie emblématique qui joue lorsque vous ouvrez un coffre dans le jeu, c'est juste sonne tellement magique ! Dans ce Instructable je vais vous montrer ho
Lumières de Noël bricolage mises en musique - Lumières de la maison chorégraphiées : 15 étapes (avec photos)
")
Lumières de Noël bricolage mises en musique - Lumières de la maison chorégraphiées: Lumières de Noël bricolage réglées en musique - Lumières de la maison chorégraphiées Ce n'est PAS un bricolage pour débutant. Vous aurez besoin d'une solide connaissance de l'électronique, des circuits, de la programmation BASIC et de l'intelligence générale de la sécurité électrique. Ce DIY s'adresse à une personne expérimentée donc