
Table des matières:
- Auteur John Day day@howwhatproduce.com.
- Public 2024-01-30 09:08.
- Dernière modifié 2025-01-23 14:46.

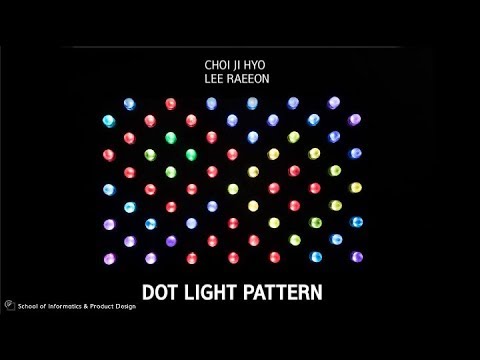


J'ai commencé avec l'idée de « Puis-je contrôler la lumière de mes propres mains et exprimer ma propre volonté ? »
Il s'agit d'un 'Dot Light Pattern' qui vous permet de créer vous-même vos propres couleurs, de concevoir vos propres motifs avec ces couleurs et d'expérimenter divers effets d'animation.
Étape 1: Matériaux


- Arduino UNO x 13
- Bande LED pixel WS2901 ou WS2811 (130 LED)
- Interrupteur à bouton x 1
- Interrupteur à ressort x 65
- Potentiomètre x 65
- Câble arc-en-ciel
- Puissance suffisante SMPS
- Câble conducteur
- Barre ronde acrylique transparente (diamètre 30mm)
- Panneau acrylique de couleur noire (5T) (500mm*790mm) x 2, (500mm*35mm) x 2, (790mm*35mm) x 2
Étape 2: Plan de construction


Étape 3: Matériel: Conception de circuits


-
Coupez la plaque acrylique comme la structure ci-dessus. (voir étape 2)
- Un morceau de LED néo-pixel est placé en haut et en bas du trou du potentiomètre, et un total de 65 paires de LED néo-pixel sont attachées.
- Une paire de LED néo-pixels est câblée ensemble pour former une seule broche Arduino.
- Montez 65 potentiomètres dans les trous du potentiomètre. (Placez-le sur le côté opposé d'une surface néo-pixelisée.)
- Fixez 65 interrupteurs à ressort pour qu'ils correspondent aux trous des interrupteurs.
- Un total de treize Arduino UNO sont attachés à chacune des treize zones afin de lier cinq pièces de 65 pièces de matériel dans un Arduino UNO.
- Comme le montre la photo ci-jointe, connectez les potentiomètres, les commutateurs instantanés et les LED néo-pixels aux broches de l'Arduino UNO par fil. (voir étape 2)
- Les broches GND et 5V de plusieurs UNO Arduino sont collectées sur les fils du câble, puis connectées à une alimentation externe. (voir étape 2)
- Enlevez la poussière par pression d'air.
Étape 4: Quincaillerie: Découpe acrylique


- Coupez la tige acrylique à une longueur de 50 mm.
- Un côté de la tige acrylique est percé à la taille et à la profondeur pour correspondre à la partie contrôleur du potentiomètre.
- La tige en acrylique est légèrement plus large que le trou pour un dégagement qui s'adapte bien au potentiomètre.
-
L'autre côté donne un peu de papier de verre pour que la lumière puisse être bien transmise.
Étape 5: Code de programmation Arduino
www.kasperkamperman.com/blog/arduino/ardui…
Code 'hsb vers rgb'를 참고한 사이트
#comprendre
//'adafruit_neopixel'헤더파일라는 라이브러리를 포함
//네오픽셀 핀번호 선언
#define PIN1 2 #define PIN2 3 #define PIN3 4 #define PIN4 5 #define PIN5 6
#define NUMPIXELS 2 //네오픽셀 LED 갯수
#define NUM_LIGHTS 5 //작동 (네오픽셀 오브젝트 갯수)
//네오픽셀 오브젝트 Tableau 선언
Pixels Adafruit_NeoPixel = { Adafruit_NeoPixel(NUMPIXELS, PIN1, NEO_GRB + NEO_KHZ800), Adafruit_NeoPixel(NUMPIXELS, PIN2, NEO_GRB + NEO_KHZ800), Adafruit_NeoPixel(NUMPIXel_NUM, NEOfruit_HZN, PIN3, NEO_DAGRBB + NEO_KHZ800) Adafruit_NeoPixel (NUMPIXELS, PIN5, NEO_GRB + NEO_KHZ800) }; ////네오픽셀을 생성한다. //첫번째 인자값은 네오픽셀의 LED의 개수 //두번째 인자값은 네오픽셀이 연결된 아두이노의 핀번호 //세번째 인자값은 네오픽셀의 타입에 따라 바뀌는 drapeau
//////////////////////////////////////////////////////////////
//////HSV RVB로 변환하는 함수 getRGB()를 위한 변수와 함수 선언
octet const dim_curve = {
0, 1, 1, 2, 2, 2, 2, 2, 2, 3, 3, 3, 3, 3, 3, 3, 3, 3, 3, 3, 3, 3, 3, 4, 4, 4, 4, 4, 4, 4, 4, 4, 4, 4, 4, 5, 5, 5, 5, 5, 5, 5, 5, 5, 5, 6, 6, 6, 6, 6, 6, 6, 6, 7, 7, 7, 7, 7, 7, 7, 8, 8, 8, 8, 8, 8, 9, 9, 9, 9, 9, 9, 10, 10, 10, 10, 10, 11, 11, 11, 11, 11, 12, 12, 12, 12, 12, 13, 13, 13, 13, 14, 14, 14, 14, 15, 15, 15, 16, 16, 16, 16, 17, 17, 17, 18, 18, 18, 19, 19, 19, 20, 20, 20, 21, 21, 22, 22, 22, 23, 23, 24, 24, 25, 25, 25, 26, 26, 27, 27, 28, 28, 29, 29, 30, 30, 31, 32, 32, 33, 33, 34, 35, 35, 36, 36, 37, 38, 38, 39, 40, 40, 41, 42, 43, 43, 44, 45, 46, 47, 48, 48, 49, 50, 51, 52, 53, 54, 55, 56, 57, 58, 59, 60, 61, 62, 63, 64, 65, 66, 68, 69, 70, 71, 73, 74, 75, 76, 78, 79, 81, 82, 83, 85, 86, 88, 90, 91, 93, 94, 96, 98, 99, 101, 103, 105, 107, 109, 110, 112, 114, 116, 118, 121, 123, 125, 127, 129, 132, 134, 136, 139, 141, 144, 146, 149, 151, 154, 157, 159, 162, 165, 168, 171, 174, 177, 180, 183, 186, 190, 193, 196, 200, 203, 207, 211, 214, 218, 222, 226, 230, 234, 238, 242, 248, 255, }; //
void getRGB(int hue, int sat, int val, int couleurs[5][3], int index) {
val = courbe_dim[val]; sat = 255 - dim_curve[255 - sat];
//색조, 및 밝기 (HSB / HSV)를 RVB로 변환
//dim_curve는 (반전)에서만 사용됩니다. //이것은 보입니다.
int r;
int g; int b; base int;
si (sat == 0) {
couleurs[index][0] = val; couleurs[index][1] = val; couleurs[index][2] = val; } autre {
base = ((255 - sat) * val) >> 8;
commutateur (teinte / 60) {
cas 0: r = val; g = (((val - base) * teinte) / 60) + base; b = socle; Pause;
cas 1:
r = (((val - base) * (60 - (teinte % 60))) / 60) + base; g = val; b = socle; Pause;
cas 2:
r = base; g = val; b = (((val - base) * (teinte % 60)) / 60) + base; Pause;
cas 3:
r = base; g = (((val - base) * (60 - (teinte % 60))) / 60) + base; b = val; Pause;
cas 4:
r = (((val - base) * (teinte % 60)) / 60) + base; g = base; b = val; Pause;
cas 5:
r = val; g = base; b = (((val - base) * (60 - (teinte % 60))) / 60) + base; Pause; }
couleurs[index][0] = r;
couleurs[index][1] = g; couleurs[index][2] = b; }
}
int rgb_colors[NUM_LIGHTS][3]; //네오픽셀 오브젝트갯수마다 couleur rvb 선언
teinte int[NUM_LIGHTS]; //네오픽셀 오브젝트갯수마다 teinte 선언 int sat[NUM_LIGHTS]; //네오픽셀 선언 int brignt[NUM_LIGHTS]; //네오픽셀 밝기 서언
//일반 변수 선언
int startSwitch = {8, 9, 10, 11, 12}; // on/off 버튼 핀번호 boolean startState = {false, false, false, false, false}; // marche/arrêt 상태변수
const int colorPin = {A0, A1, A2, A3, A4}; // 핀번호
int colorVal = {0, 0, 0, 0, 0}; // 초기값
int animationButton = 7; // 모드변환 버튼 핀번호
/////////////////////////////////////////////////
//애니메이션 //디바운싱? 시간내 많은 문제에 대해서 지정된 시간 간격으로 함수를 호출하여 int buttonState; // 입력 핀으로부터의 현재 판독값 int lastButtonState = HIGH; // 이전의 판독값은 켜진상태로 long lastDebounceTime non signé = 0; // 출력핀이 마지막으로 전환된 시간은 0으로 délai anti-rebond long non signé = 50; // 타임설정;출력이 깜빡이면 증가한다 int MODE = 0; //애니메이션 모드변수
int B_Interval[5]; //블링킹을 각 속도 변수
entier B_Min = 100; //블링킹 최단속도; entier B_Max = 500; //블링킹 최장속도; int R_Interval = 50; //레인보우 애니메이션 속도 변수 int D_Interval = 10; //디밍 속도 변수
booléen B_state[5]; //블링킹을 위한 각 모듈의 상태변수
///////////////////////////////////////////////////////
//멀티테스킹 애니메이션을 위한 시간변수 선언
courant long non signé Millis; //현재시간 변수
long non signé B_previousMillis[5]; //각 모듈의 블링킹 타이머 long non signé DR_Millis[5]; //각 모듈의 디밍 랜덤 타이머(예비) long non signé R_previousMillis; //레인보우 타이머 long non signé D_previousMillis; //디밍 타이머
booléen firstRainbow = true; //레인보우 초기화 상태변수
int RainbowSpeed; //레인보우 변환변수
int Lumineux = 100; //디밍 초기값 int BrightnessFactor = 1; //디밍 증감 값 /////////////////////////////////////////// //////////////////////////////////////
void setup() {
for (int i = 0; i < NUM_LIGHTS; i++) { pixels.begin(); //네오픽셀 오브젝트 초기화 }
//버튼 인풋 설정
for (int i = 0; i < NUM_LIGHTS; i++) { pinMode(startsSwitch, INPUT_PULLUP); //on/off 버튼 인풋 설정 } pinMode(animationButton, INPUT_PULLUP); //애니메이션 인풋 설정
for (int i = 0; i < NUM_LIGHTS; i++) { B_Interval = int(random(B_Min, B_Max)); //모듈별 블링킹 랜덤 속도(인터발) 변수 생성 }
Serial.begin(9600); //통신 설정
}
boucle vide() {
MODE = CheckAnimMode(); //모드에 애니메이션체크모드함수를 넣는다
//버튼과 지정한다.
for (int i = 0; i < NUM_LIGHTS; i++) { startState = !digitalRead(startsSwitch); //on/off 버튼에서 읽은 값의 반대값을 startState에 넣어준다 //startState = digitalRead(startsSwitch); colorVal = analogRead(colorPin); //가변저항에서 읽은 값을 가변저항 초기값에 }
switch (MODE) { //애니메이션함수 스위치문
cas 0: on(); //on함수 실행 pause; //조건문에서 빠져나가라
cas 1:
arc-en-ciel(); //arc-en-ciel함수 실행 pause;
cas 2:
atténuation(); // gradation함수 실행 pause;
cas 3:
clignotant(); //clignotant함수 실행 pause; }
for (int i = 0; i < NUM_LIGHTS; i++) { pixels.show(); //네오픽셀 오브젝트 배열 }
}
/////////////////////////////////////////////////////////////
int CheckAnimMode() {
//애니메이션 결정한다.
/////////////////////////////////////////////////////////////// /// currentMillis = millis(); // 시간 측정 int lecture = digitalRead(animationButton); if (lecture != lastButtonState) { //입력핀으로부터 이전의 버튼의 상태와 lastDebounceTime = millis(); //현재 시간을 출력핀이 마지막으로 시간에 넣음 }
if ((currentMillis - lastDebounceTime) > debounceDelay) {
if (lecture != buttonState) { //입력핀으로부터 받은 현재값과 판독값과 비교
boutonÉtat = lecture; //판독값을 buttonState에 대입
if (buttonState == LOW) { //버튼상태가 꺼져있다면
MODE++; //버튼모드 1씩 증가 si (MODE > 3) { MODE = 0; premierarc-en-ciel = vrai; //레인보우 색상 초기화 상태 켜짐 BrightnessFactor = 1; //디밍 증감값 Lumineux = 15; //밝기는 15 } } } }
lastButtonState = lecture; //판독값을 버튼상태에 대입
retour MODE; 종료하고 mode함수로 값을 리턴하라 }
////////////////////////////////////////////////////////////////////
//fonctionnement du mode animation
//au
void on() { Serial.println("on"); //시리얼 모니터에 on을 써라 for (int i = 0; i < NUM_LIGHTS; i++) { color_set(i, colorVal); //가변저항 값에 따라 컬러 셋팅 } }
//Arc-en-ciel
void arc-en-ciel() { Serial.println("pluie"); //시리얼 모니터에 pluie을 써라 if (firstRainbow) { RainbowSpeed = 0; //레인보우 속도 초기화 firstRainbow = false; //레인보우 색상 초기화 상태 꺼짐 } if (millis() - R_previousMillis > R_Interval) { //흐른 시간값이 레인보우 인터벌 값보다 크면 R_previousMillis = currentMillis; //현재시간을 이전의 시간에 넣어라 RainbowSpeed += 10; //레인보우 변환변수에 10을 }
for (int i = 0; i < NUM_LIGHTS; i++) { color_set(i, (colorVal + RainbowSpeed) % 1023); //레인보우컬러셋팅 }
}
//Atténuation
void gradation() { Serial.println("dimm"); //시리얼모니터에 dimm을 써라 Serial.println(Bright); //시리얼모니터에 Bright를 써라 if (currentMillis - D_previousMillis > D_Interval) { //흐른 시간값이 디밍 인터벌 값보다 크면 D_previousMillis = currentMillis; //현재시간을 이전의 디밍 시간에 넣어라 Bright += BrightnessFactor; //밝기에 디밍 증감값 1씩 올려라 } if (Bright 254) { BrightnessFactor = -1 * BrightnessFactor; } Lumineux = contraindre (Lumineux, 99, 254); //변수 밝기값을 최소값99~최대값254 값으로 한정한다
for (int i = 0; i < NUM_LIGHTS; i++) { dim_color_set(i, Bright); //디밍컬러셋팅 } }
//Clignotant
void clignotant() { Serial.println("blink"); //시리얼모니터에 clignoter를 써라
for (int i = 0; i B_Interval) { //흐른 시간값이 블링크 인터벌 값보다 크면
B_previousMillis = currentMillis; //현재시간을 이전의 블링크 시간에 넣어라 B_state = !B_state; //각 모듈의 블링킹 상태변수의 값의 반대값을 대입하라 } } pour (int i = 0; i < NUM_LIGHTS; i++) { if (B_state) { //모듈의 블링킹 상태가 읽 히면 color_set(i, colorVal); //가변저항 값에 따라 컬러 셋팅 } else { noColor_set(i); //읽히지 않으면 컬러 셋팅 하지않음 } }
}
////////////////////////////////////////////////////////////////////////////////////////
//fonction de base
//jeu de couleurs
void color_set(int index, int colorSenser) {
if (startState[index]) { hue[index] = map(colorSenser, 0, 1023, 0, 359); //0~1023값을 0~359값으로 매핑한 값을 지정(colorSenser에) getRGB(hue[index], 255, 255, rgb_colors, index); for (int i = 0; i < NUMPIXELS; i++) { pixels[index].setPixelColor(i, pixels[index]. Color(rgb_colors[index][0], rgb_colors[index][1], rgb_colors[index] [2])); } //픽셀컬러 셋팅을 rgb_colors의 r, g, b으로 설정 } else noColor_set(index); //컬러셋팅 하지않음 }
//////pas de couleur définie
void noColor_set(int index) { //컬러셋팅 하지않는 함수 설정
for (int i = 0; i < NUMPIXELS; i++) { pixels[index].setPixelColor(i, pixels[index]. Color(0, 0, 0)); } //픽셀컬러 0, 0, 0으로 설정 }
////dimColor set
void dim_color_set(int index, int BC) { //디밍컬러셋팅 함수 설정
if (startState[index]) { hue[index] = map(colorVal[index], 0, 1023, 0, 359); //0~1023값을 0~359값으로 매핑한 값을 가지고 (colorVal에) getRGB(hue[index], 255, BC, rgb_colors, index); for (int i = 0; i < NUMPIXELS; i++) { pixels[index].setPixelColor(i, pixels[index]. Color(rgb_colors[index][0], rgb_colors[index][1], rgb_colors[index] [2])); } ///픽셀컬러 셋팅을 rgb_colors의 r, g, b으로 설정 } else noColor_set(index); //컬러셋팅 하지않음 }
Étape 6: Un look fini
Conseillé:
Comment faire un panneau lumineux LED super lumineux - Version simple : 8 étapes (avec photos)
")
Comment faire un panneau lumineux LED super brillant - Version simple : Aujourd'hui, je partage avec vous comment faire un beau panneau lumineux LED super brillant à partir d'un ancien écran LCD. Il s'agit d'une version simple que vous pouvez utiliser 18650 avec une sortie 5v pour un téléphone intelligent, etc
Tutoriel ME 470 : Caractéristiques du motif : 6 étapes

Tutoriel ME 470 : Fonctionnalités des motifs : les motifs peuvent vous faire gagner beaucoup de temps sur les pièces qui ont des caractéristiques répétées
Faire une veilleuse LED avec motif en étoile : 8 étapes (avec photos)
")
Fabriquer une veilleuse à LED avec motif en étoile : cette veilleuse à LED présente un motif en étoile et illumine une pièce sombre de manière magique. J'ai utilisé de l'ipé pour le bois, mais n'importe quel bois sombre ou MDF peint par exemple fonctionnerait bien. C'est un projet vraiment amusant et serait génial comme éclairage d'accentuation
Couverture Robo : Crochetez une couverture à l'aide d'un motif de point de croix. : 3 étapes (avec photos)
")
Couverture Robo : Crocheter une couverture à l'aide d'un motif de point de croix. : J'aime crocheter. Je le fais depuis que je suis petit. Mais tout récemment, j'ai découvert comment crocheter des images. Maintenant, je vais vous montrer comment. Vous aurez besoin de :Fil de différentes couleurs. Un modèle de point de croixUn crochet. (J'ai utilisé la taille H) Vous pouvez obtenir des cro
Cadre lumineux (pour caisson lumineux de photographie Tekjocks): 3 étapes
: 3 étapes")
Cadre lumineux (pour Tekjocks Photography Light Box): Voici la suite de mon Photography Light Box. Je ne vais pas m'étendre sur celui-ci car cela dépendra de la taille du tube que vous obtiendrez déterminera la taille du matériel dont vous aurez besoin. Ce sera donc un tutoriel très basique. je serai posté